How to Build a Budget-Friendly Outdoor Sauna in Your Backyard
Learning how to build an outdoor sauna cheap is easier than you think when using smart strategies and affordable materials. Many people are discovering they can create their own relaxing retreat with simple DIY methods, enjoying all the health benefits of a sauna without spending a fortune.
You can build your outdoor sauna affordably by using inexpensive materials such as reclaimed wood and considering minimalistic designs. This approach allows you to create a cost-efficient sauna tailored to your needs.
Learning a few basic techniques can significantly reduce the amount you need to spend on professional help. You can also control the size and features to match your preferences.
In this how-to guide, we provide practical next steps for building your own outdoor sauna. You can enjoy a fun and memorable experience without overspending.
Is Building a Sauna Cheaper Than Buying?
As you will see in the next section, building your own sauna can be much less expensive than buying a ready-made one. By choosing the DIY route, you can save 30% to 40% compared to purchasing a pre-built sauna. Pre-built saunas typically range from $3,000 to over $20,000, depending on size and features.
This wide price range demonstrates that a custom sauna can be a smart investment. We believe it offers excellent value for those willing to dedicate the necessary time and effort.
In fact, building your own sauna can save you even more money over time. Long-term costs can be significantly reduced with strategic decisions, even if the initial budget seems daunting.
To build an affordable outdoor sauna, start by making smart material choices. While investing in a quality sauna stove and durable hot room materials may cost more upfront, it ensures long-term safety and helps prevent costly repairs. Careful planning helps you avoid hidden expenses, making your DIY project both affordable and long-lasting.
Another advantage of a DIY sauna is having complete creative control to customize the space to your preferences, from the size and layout to the specific features and materials you desire. Want a larger seating area or an aspen wood sauna? You can make those choices.
Personal touches greatly enhance your sauna experience, and these customizations will help tailor it to your specific needs.
A well-constructed home sauna can also add value to your property. Homebuyers will notice the beauty, craftsmanship, and care that go into a well-built sauna, making your home even more appealing.
In a competitive market, this unique feature can help your property stand out, offering both personal enjoyment and investment value.
Plan Your Budget-Friendly Sauna
Building a sauna can be a fun, rewarding, and affordable project with proper planning. Plan the main components of your sauna and budget accordingly. Remember to account for hidden expenses that may arise during construction.
To build an outdoor sauna cheap, create a detailed timeline for each budgeting phase to keep costs manageable. Focus on prioritizing essential features first – this helps you stay within budget while still creating your dream sauna. Smart financial planning from the start ensures you get quality results without overspending.
1. Define Sauna Size and Features
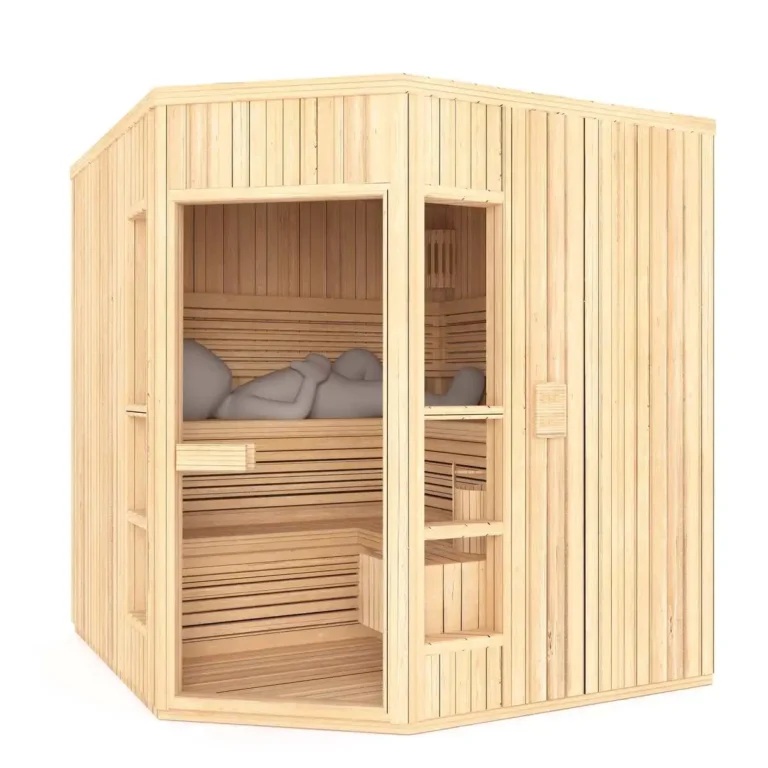
One, determine how many people you intend to accommodate. Next, consider the space you have available to figure out what size sauna would work best for you.
Six feet by eight feet is a nice, manageable size for a hot room, but you’ll want to be careful that you have enough room for a changing area. A 6kW sauna heater will get your sauna up to around 205 degrees in less than an hour.
It runs you only about $170, so it’s a nice little frill for your sauna. Make smart layout choices to maximize comfort and functionality, and weigh the benefits of the creative trade-offs between width and cost-saving efficiency.
2. Research Local Building Codes
Research local codes and regulations that may affect sauna design and construction. Develop a roadmap of required permits and approvals, as well as applicable safety standards for installations.
Be aware of zoning regulations that may restrict where you can locate your sauna.
3. Create a Detailed Material List
Create an accurate list of materials needed for the build. Organize the materials into categories such as wood framing, insulation, and plumbing fixtures.
Include your estimated cost for each category to help you stay within your budget. Research local suppliers and online resources to find the best prices and maximize your savings.
Using salvaged, reclaimed, or repurposed materials can significantly reduce costs.
4. Design for Energy Efficiency
Incorporate energy-efficient designs from the beginning to reduce future operational costs. Research insulation types that maximize heat retention, and ensure proper ventilation to prevent air quality issues.
You can create an inviting and relaxing sauna environment by choosing energy-efficient appliances and lighting.
5. Set a Realistic Budget
Learning how to build an outdoor sauna cheap starts with creating a realistic budget for materials and labor, plus a buffer for unexpected costs. Track every expense closely throughout the project, and stay flexible—being willing to adjust plans helps you finish your DIY sauna without breaking your budget.
Choose a Cost-Effective Foundation
Selecting the proper foundation for your outdoor sauna is a critical step that affects overall costs, longevity, and final appearance. When figuring out how to build an outdoor sauna cheap, evaluate different foundation options to find one that meets both your budget and site requirements while ensuring structural integrity.
1. Concrete Slab Foundation Guide
Specifying and pouring a single concrete slab isn’t a straightforward process. Begin by outlining the area, then excavate the location to a depth of 4 inches. Once you’ve leveled the ground, roll out a vapor barrier and then cover it with rebar to reinforce the slab.
Step 6—Pour the concrete and let it cure. Although a poured concrete slab provides outstanding durability, it is an expensive option that involves complicated installation. Basic tools would be a concrete mixer, shovel, and level.
2. Gravel Pad Foundation Overview
Gravel pad foundations are easy to make. Start by removing debris and leveling the ground. Include a landscape fabric, then 4 inches of Class 5 gravel.
This foundation provides superior moisture control and drainage. It requires minimal materials: gravel and a fabric layer to prevent weed growth.
3. Pier Foundation Details
It works like this: making a pier foundation involves digging holes or setting sonotubes or deck blocks. This approach lifts the sauna, avoiding expensive moisture deterioration.
You will need gravel and some 4×6-inch posts for added support. Making sure things are level is important; get the posts lined up right and bolt them in place with galvanized carriage bolts.
4. Wood Foundation Insights
Using wood for a foundation can be an economical choice, especially when working with abundant local materials like beetle-kill pine. If you’re learning how to build an outdoor wood-fired sauna, keep in mind that while wood is cost-effective, it requires more maintenance than concrete or stone. Factor this into your plans to ensure long-term durability and structural integrity.
Select sustainably sourced wood materials to maximize environmental impact.
5. Plinth Foundation Guide
A plinth foundation is made up of concrete blocks stacked in a pattern to provide support for the sauna. It is frequently less expensive than a complete concrete slab, and it delivers excellent insulation value.
Materials are concrete blocks and waxed insulation for cold-weather advantage.
6. Screw Foundation Insights
Screw foundations are faster to install and soil-type independent. The installation process consists of screwing metal posts into the ground, which makes them a great option where the ground may not be even.
7. Preparing the Groundwork
Before beginning any foundation construction, from cranes to dirt work, clean debris off the site and prep the area. Evaluate existing soil conditions to maintain natural drainage patterns.
Make sure to mark the sauna footprint correctly so you don’t accidentally build it out of alignment.
Select Budget-Friendly Sauna Materials
If you’re trying to build an outdoor sauna on a budget, the selection of appropriate materials is a good place to begin. Knowing how to save on wood, insulation, and heating sources can save you a lot without sacrificing quality.
What is the Cheapest Wood to Use?
When considering what wood a sauna is made of, softwoods like pine, cedar, and spruce are top choices. Not only are these the most affordable options, but they’re also lightweight, easy to work with, and offer excellent thermal properties – making them ideal for sauna construction.
Why it’s good: As a group, softwoods are quick to heat, which makes them workable in sauna settings. Though generally more durable, hardwoods can be more expensive and do a poor job of holding heat.
To build an outdoor sauna cheap, source materials locally by checking lumberyards, home improvement stores, and online marketplaces like Craigslist or Facebook Marketplace for discounted wood. Remember – proper treatment of any materials you find will ensure your budget-friendly sauna lasts for years.
Even with wood, using waterproof sealants will resist moisture and greatly extend the life of the wood.
Source: Recycled or Reclaimed Materials
Cost savings can be even greater by using a combination of recycled or reused materials. Look for reclaimed wood at local construction sites, salvage yards, or on local online forums such as Craigslist.
This choice is both budget-friendly and environmentally friendly, as it reduces waste.
When assessing quality, check for signs of damage, rot, or pest infestation. A thorough inspection ensures you use materials that are both visually appealing and structurally sound.
Choose Affordable Insulation Options
Materials like fiberglass and foam are effective, but ensure the insulation is safe for high temperatures and moisture. Affordable options such as fiberglass batts or foam board can work well and save money.
These solid materials are excellent heat reservoirs and insulators, providing maximum heat retention with minimal energy use. Consider more sustainable options that offer high thermal resistance, even on a budget.
Properly installed insulation can make a significant difference – ensure it is fitted securely and tightly in walls and ceilings to prevent heat loss.
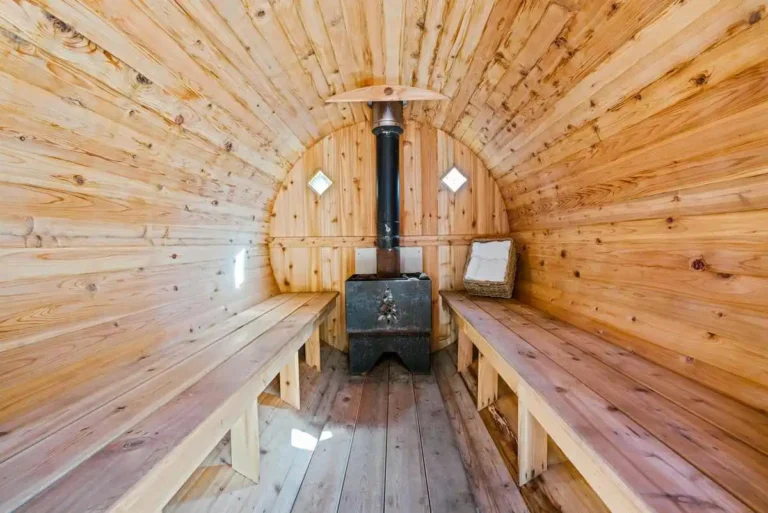
Consider Alternative Heat Sources
These can include wood stoves or infrared heaters — both of which can save you a pretty penny compared to traditional electric stoves. Wood stoves are generally cheaper in the long run, while infrared heaters warm you up fast.
To build an outdoor sauna cheap, carefully compare heating sources by evaluating both upfront installation costs and long-term efficiency ratings. Research each material’s specific requirements – proper planning for installation and maintenance will help keep your project affordable while ensuring optimal performance.
Step-by-Step Sauna Construction Guide
Building a sauna can be a rewarding experience, and understanding the main phases of construction is a great place to begin. The process involves several key stages: planning, constructing the floor frame, building the walls, installing the roof, adding the door, creating the interior bench setup, setting up the sauna stove, installing windows and air vents, and finally, adding lighting and switches.
Each step is unique and has its own timeline. The entire process usually takes anywhere from a few days to one or two weeks, depending on your experience and the complexity of your design.
Safety Note: Safety should always be your top priority. Use protective equipment and keep your tools and building materials in good condition. Using a checklist will help you stay organized and ensure that no steps are missed.
1. Constructing the Floor Frame
First, measure and mark the size of the sauna you want to build. Construct an 8’ x 12’ frame using treated lumber for durability, ensuring the frame is square and level. Make sure the joints are square to prevent future issues.
One of the most common mistakes when building this frame is failing to bolt it securely, which can cause instability. Install brackets at all intersecting joints to increase stability.
2. Building the Walls
Construct the stud walls using 2×4 lumber, and insert vertical studs every 16 inches. Applying tongue-and-groove paneling instead creates a smooth surface and increases insulation value.
Insulate the walls with non-combustible fiberglass batts to retain heat. Remember to include ventilation openings to prevent moisture accumulation.
3. Installing the Roof
Build the roof with a slope to allow rain to run off. Choose durable materials, such as shingles or metal, that will withstand moisture and outdoor elements.
Creating a waterproof barrier between the sauna structure and the outside will help prevent leaks. Always use ladders safely and follow proper safety practices when working at heights.
4. Adding the Door
Select an insulated door to help retain heat. Make sure it closes tightly to maintain sauna temperatures.
Popular options include solid wood and insulated fiberglass, both of which offer durability and insulation.
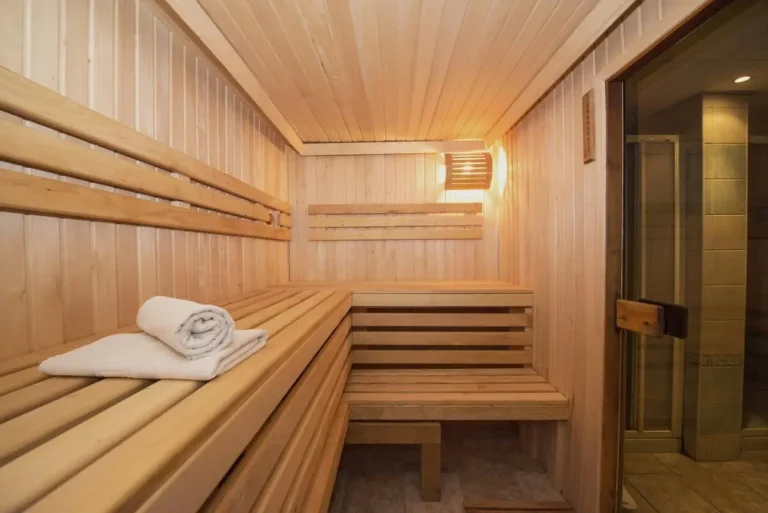
5. Creating an Interior Bench Setup
Plan for benches to be removable and set at appropriate heights ranging from 18 to 24 inches. Choose heat-resistant materials such as cedar or aspen.
Arrange the benches to maximize airflow, which can enhance your sauna experience.
6. Setting Up Sauna Stove
Install the stove according to the manufacturer’s instructions, paying careful attention to venting.
Electric versus Wood Burning: Electric or wood-burning options are available, and each has specific advantages.
The importance of following safety precautions during installation cannot be overstated. Keep required clearances.
7. Installing Windows and Air Vents
Choose double-pane tempered glass to install windows that will hold up against the sauna’s heat and humidity. Place the vents in appropriate locations to improve the flow of air and increase comfort.
Choose materials that will not warp or be destroyed by moisture.
8. Adding Lighting and Switches
Install moisture-resistant light fixtures and electrical components for safety and durability. The warm, soft glow of the lighting adds to the relaxing ambience, deepening your sauna experience.
Be extremely cautious as you add in electrical components, and always follow your local building codes.
Essential Tools and Supplies Checklist
Constructing a backyard sauna takes attention to detail and having the right supplies on hand. With a complete checklist in hand, you can feel confident that you won’t forget any essential items.
Construction Tools
Start with the tools of structural design. Use a circular saw to make your wood cuts, a drill to create holes for anchoring, and a level to ensure everything is true and plumb.
Do not forget a measuring tape to ensure accurate dimensions. A variety of hammers and a screwdriver set will be useful, as you will need them to assemble your sauna.
Safety Gear
Safety gear to protect against vehicles is essential. When cutting or drilling wood, be sure to wear safety goggles to protect your eyes from sawdust and debris.
Learning how to build an outdoor sauna cheap requires proper safety gear – wear ear protection for loud power tools and heavy-duty gloves to prevent splinters. For electrical components, use insulated tools and rubber-soled shoes to avoid shocks while keeping your budget-friendly project safe.
Insulation Materials
For a warm home, effective insulation is essential. Choose quality insulation materials such as fiberglass or foam board. These options are easy to cut to fit your sauna’s exact measurements.
Do not forget vapor barriers to protect your wood from moisture. Consider using cedar or pine wood for the interior. These materials resist humidity and provide a soothing scent inside the home.
Shopping Tips
As you procure your tools and supplies, don’t forget to check the local hardware store for better prices. Most have rental programs for pricier tools, you might only use once.
Online marketplaces can be a great way to help you find new or used items at a great price. Tip: Always check prices to make sure that you’re getting the best value.
Conclusion
Collecting these tools and supplies will set you up for a rewarding and successful space-enhancing sauna build.
Prioritize Sauna Safety Measures
When learning how to build an outdoor sauna cheap, never compromise on safety. Design your sauna with crucial features from the start, including an outward-opening door to prevent trapping occupants. While saving money is important, these protective measures ensure your rewarding DIY project remains safe for everyone.
Use heat-resistant materials for the walls and ceiling to reduce fire hazards. As a safety measure, non-slip flooring is very important to avoid slips, trips, and falls, particularly in wet areas. These elements combine to ensure a safe sauna experience for all bathers.
Proper ventilation is essential for overall health, safety, and comfort. To ventilate your sauna effectively, plan for an inlet vent near the floor and an outlet vent near the ceiling. This setup enables cross-ventilation with fresh air.
It helps regulate humidity levels, so even when you are exposed to high temperatures, you can still breathe comfortably. Good ventilation also reduces the buildup of dangerous gases, ensuring safety during your relaxation.
When handling electrical installations, safety must always be your top priority. If your sauna requires wiring, hire a licensed electrician. They will ensure your sauna’s electrical system meets code requirements, reducing the risk of electrical shock or fire.
Install GFCI (Ground Fault Circuit Interrupter) outlets for added protection. These devices can immediately shut off electrical flow during a fault, providing an extra layer of safety. This is especially important if your sauna is near a body of water.
To maintain long-term safety, prioritize structural integrity during construction by using pressure-treated wood for foundations and framing to prevent rot. When building an inexpensive outdoor sauna, regularly inspect for damage and reinforce vulnerable areas – this maintenance protects your investment and keeps costs low.
Securing your sauna to the foundation with proper anchoring techniques will help it withstand strong winds and other weather conditions.
Maximize Energy Efficiency
By making your outdoor sauna more energy-efficient, you can reduce your overall operational costs. Not only is it cost-effective, but it fosters a healthier lifestyle. Begin the process by focusing on correct insulation.
Insulating the walls, roof, and floor minimizes heat escaping, so the sauna heats up fast and reaches peak temperatures quickly. Especially use fibrous materials such as fiberglass, cellulose, or foam board. These materials are highly effective at reducing heat flow.
Sealing the tiniest gaps around doors and windows eliminates cold drafts and heat loss. A couple of hundred dollars of simple weather stripping can save a lot of money while keeping a stable environment.
Timers & Thermostats
As with all energy-efficient practices, timers and thermostats are essential. Use a programmable timer to optimize your sauna experience by scheduling it to reach the desired temperature just before you plan to use it.
This approach ensures the sauna is at the perfect temperature when you enter, reducing energy waste. Like a digital thermostat, the right solution maintains your ideal temperature without unnecessary energy use.
For example, you can save energy by lowering the sauna’s temperature or turning it off when not in use. This also ensures you return to a comfortable environment later.
Energy-Efficient Appliances
Using energy-efficient appliances can help make your sauna more sustainable. Choose infrared heaters and heaters with high energy efficiency ratings. These units use less energy by providing the same amount of heating output with less energy usage.
Electric heaters with adjustable settings allow you to turn them up or down depending on your needs and adjust the energy output accordingly. If you’re passionate about energy efficiency, you can try powering your sauna with solar panels.
When you power your home with renewable energy, you lower your electricity costs and reduce your impact on the environment.
Avoid Common DIY Sauna Mistakes
Building your own outdoor sauna is a rewarding DIY project, but many people make common mistakes. By learning about these errors, you can avoid wasting time and money.
The most common mistake is not giving enough thought to insulation. Proper insulation retains heat and ensures your sauna is energy efficient. Materials such as fiberglass or foam boards are effective choices.
Another frequent error is neglecting your sauna’s ventilation. Proper ventilation prevents moisture buildup and creates a more comfortable environment. Installing vents at both the top and bottom of the sauna maximizes airflow and improves performance.
Careful planning is essential to avoid these mistakes. Start by creating a detailed plan for your sauna, noting the locations of doors and windows. This will help you visualize the space and prevent a range of other potential errors.
Gather all your materials before starting construction. Having everything ready helps you avoid making impulsive decisions that can lead to mistakes.
It is essential to follow local building codes. These codes set standards for structural integrity and safety, and you must meet or exceed them during construction.
Check your local or state regulations to ensure all requirements are met. This will help keep your sauna safe and enjoyable and protect your investment over time.
Even experienced DIY enthusiasts should consult professionals. Consulting someone with construction experience provides valuable knowledge and helps you avoid costly errors.
Whether you hire a contractor for a specialty consultation or seek advice from a knowledgeable friend, reaching out for expert input is well worth the effort.
Maintain Your Budget Sauna
Caring for your yard sauna is key to ensuring you’ll enjoy it for years to come! A few simple maintenance tasks will keep your sauna safe, fully functional, and looking its best in its natural beauty.
Start with basic maintenance – inspect the heater, verify proper ventilation, and check wood surfaces for damage. To build an outdoor sauna cheap that lasts, run sessions monthly (even off-season) to maintain the heater’s function and preserve your sauna’s condition long-term.
Keeping your sauna materials clean should be equally important. Develop a cleaning routine with a basic water and mild soap solution, and disinfect sauna walls and benches after each use. This keeps moisture and smells from accumulating, which can cause mold or mildew.
Do not forget to clean benches and walls, as these areas can accumulate sweat and dirt. Apply a natural oil or wood conditioner to your wood surfaces about every six months. This helps keep them looking new and prevents drying and cracking.
Monitoring for signs of wear and tear can save you money on future maintenance. Check the seals on the door and joints, and look for cracks where you can see the firebox or where heat might escape.
If you find cracked or warped wood, replace those boards immediately to preserve insulation quality and prevent pests from entering. Addressing these issues promptly prevents more expensive problems, such as structural damage or increased energy bills.
Do not ignore signs of larger problems, such as heat loss or unusual odors. If your sauna is not heating properly, you may need to inspect the heater or sauna insulation.
Create a sauna maintenance log and checklist. This way, you can enjoy your sauna for many years without unexpected expenses.
Final Touches and Enjoyment
Whether your outdoor sauna is nearly complete or still in the planning stages, those final touches truly elevate your experience. Here is how a simple checklist can help you as you consider ways to enhance your sauna experience.
Consider ventilation. Proper ventilation is essential for maintaining a comfortable and healthy environment while preventing excess humidity and moisture buildup.
Hang a solid core door that closes tightly to keep warmth and conversations inside. If you plan to use your sauna regularly, insulate the walls to maintain the temperature.
Plan for alternative heating. Consider a more efficient heat source, such as a wood-burning stove or electric infrared heaters. This will ensure a familiar and enjoyable experience.
Whatever you choose, personalizing your sauna space makes it uniquely yours. Choose colors and materials that make you happy. Using natural materials, such as wooden accents or stone elements, helps create a calming atmosphere.
Add personal touches. Go beyond plants and natural light – include artwork or photographs that promote peace and restoration. This area should reflect your aesthetic, creating a soothing retreat you will look forward to spending time in.
Setting the scene for relaxation is essential.
Use the right accessories. Accessories such as soft, ambient lighting can help create a relaxing mood. Consider LED lights with color variations or dimmable fixtures to control brightness levels.
Aromatherapy is another key factor in enhancing your sauna experience, especially if you’re learning how to build an outdoor sauna cheap. Adding essential oils like eucalyptus—known for its clarifying and soothing properties—can elevate relaxation, rejuvenate breathing, and clear sinuses. This simple, cost-effective upgrade maximizes comfort without breaking the bank.
Supportive soft towels and the comforting texture of a luxurious chaise lounge can increase your enjoyment even more.
Whether you prefer infrared or traditional, regular sauna sessions can improve your overall health. They improve circulation, decrease stress, and help to relieve muscle soreness.
When you make sauna time a regular part of your routine, you’re promoting physical wellness and mental clarity. Soon, these sessions will become one of your favorite parts of the day, as you learn to create a calmer mind and body.
Conclusion
Constructing a cheap outdoor sauna brings the luxury of tranquility to your backyard while offering detoxifying benefits. By carefully planning your project and selecting affordable materials, you’ll create a personal sanctuary that delivers both satisfaction and relaxation. Remember to prioritize safety and energy efficiency throughout the build process – this ensures your budget-friendly retreat remains a source of enjoyment for years to come.
Now’s the time to roll up your sleeves and start this rewarding DIY journey. Gather your tools, procure your materials, and begin building your dream sauna. So go forth, enjoy the journey, and before long, you’ll be relaxing in blissful serenity within your very own backyard retreat.