How to Build an Outdoor Sauna: A Complete Guide
Learning how to build an outdoor sauna is an exciting endeavor that adds significant value to your yard while enhancing your active, mindful lifestyle. This rewarding project combines practical construction skills with the promise of long-term relaxation and wellness benefits right in your backyard.
To begin your sauna-building journey, gather essential materials like treated wood, insulation, and a heat source – the fundamental first step in learning how to build an outdoor sauna. Your design can be as compact or spacious as desired, though a 6×8-foot layout offers ample room for multiple users while maintaining efficient heat retention.
You should pay attention to ventilation and making water accessible for an easy sauna experience. Once you arrive on your plan, you can start building simple, sturdy, long-lasting, weatherproof walls and a roof.
In this guide, we’ll walk through each step in detail to help you create a sauna that fits your lifestyle and space.
How to Build an Outdoor Sauna: Planning Your Project
An outdoor sauna is an ambitious, fascinating, and rewarding project that needs to be well planned out. Knowing your space, sauna needs, and local codes will set you on a path toward sauna greatness.
Assess Location and Size Needs
Start by evaluating your available space. A sauna measuring at least four feet by six feet accommodates two to three people comfortably, but you might prefer a larger size for more guests.
Assess sunlight exposure and wind direction for optimal placement. For privacy, choose a location that feels secluded yet accessible. Measuring the area helps confirm that your chosen dimensions fit well.
Considering landscaping elements like trees or shrubs can enhance the overall experience.
Internal vs External Sauna Placement
First, determine if you want your sauna to be located indoors or outdoors. An internal sauna provides more convenience, but it will affect the flow of your home.
An outdoor sauna offers a different experience, but you’ll want to think about style and possible sound concerns. Consider how each choice would fit into your life.
Distance from House Considerations
Consider the perfect proximity to your home. Access to water and electricity is crucial.
Local building codes often dictate specific setback requirements – a crucial consideration when learning how to build an outdoor sauna properly. While matching your sauna’s design to your property’s aesthetic is important, always prioritize verifying these regulations before finalizing your plans to avoid costly revisions later.
Kit or DIY: Which is Right?
Consider your construction skills. When deciding between a kit or a DIY project, prefabricated kits can make the assembly process easier but may not offer as many customization options.
Consider the costs for each option, remembering to factor in the time investment required.
Understand Local Codes and Permits
Prior to construction, make sure to look into your local building codes and get any needed permits. Legal compliance is very important, as you don’t want to deal with the consequences of noncompliance.
Maintain detailed documentation of all permits and inspections for your reference later on.
Choose the Right Foundation
Selecting the right foundation for your outdoor sauna is one of the most crucial decisions you’ll make – a key lesson when learning how to build an outdoor sauna properly. Your foundation choice directly impacts stability, longevity, and project success. Always evaluate soil conditions, drainage patterns, frost depth, and slope stability before finalizing your foundation design.
There are cost considerations with every foundation option, so budget accordingly. Additionally, considering the long-term durability and maintenance requirements of each type will help you make sure your sauna stays a dependable wellness escape.
1. Prepare the Groundwork
Start with site preparation—clear the area of debris, vegetation, and hazards that could compromise your foundation. When learning how to build an outdoor sauna, proper ground leveling is crucial; invest time here to create a stable base that ensures long-term durability for your project.
Trace the foundation outline with stakes and string, double-checking for level and square to avoid mistakes. Compact the soil enough to avoid future settling once the construction is completed.
2. Concrete Slab Foundation Guide
If you’d like to build a concrete slab, we provide detailed building instructions on each. Both proper mixing and curing are essential. Add reinforcement materials, such as rebar to provide added strength.
Provide a thickening slab at least 5-7 inches thick. A thinner base can sink as time goes on, leading to even more costly work in the long run. Account for sufficient drying time before moving on to the sauna itself.
3. How to Install a Pier Foundation for Your Outdoor Sauna
As you install the pier foundation, address the arrangement with consideration for the size of the sauna you’ll install. On the ground, dig holes deep enough to avoid frost heave.
Use concrete or treated timbers and make sure they are all even, so you can create a level surface to build your structure on.
4. Gravel Foundation Advantages
A gravel foundation has very good drainage properties and is relatively simple to install. Figure the amount of gravel required according to sauna size and pack it down tightly for a firm foundation.
Installing a weed barrier right after installation can eliminate the vegetation growing around the sauna.
5. Wood Foundation Considerations
Consider the advantages and disadvantages of a wood foundation. Choose rot-resistant wood species and provide adequate ventilation to prevent moisture accumulation.
Deterioration can be avoided with regular inspection.
6. Trench Foundation Explained
The trench foundation approach requires digging trenches at least 48 inches deep around the sauna’s perimeter. Size and fill them with concrete or gravel for structural support and drainage.
Be sure to extend them deep enough to avoid frost lines in colder climates.
7. Screw Foundation Benefits
Screw foundations can be installed rapidly with little site disruption. Check their load-bearing capacity to make sure they can handle your sauna’s needs.
8. Plinth Foundation Overview
A plinth foundation means building a flat, stable surface with concrete masonry blocks or pressure-treated timber raised above ground moisture levels.
9. Account for Ground Frost
Explore the depths of the local frost line. Select a foundation type that reduces the risks of frost heave and insulate the foundation as appropriate.
10. Foundation Choice Factors
Look at local specificities such as soil type and climate. Think about the sauna’s footprint and bulk, ease of installation, and your local building codes.
How to Build an Outdoor Sauna: Essential Supplies Checklist
There are so many benefits to building your own sauna, not the least of which is the cost savings. By going the DIY route, you could save an additional $1,500 to $5,000+ on your sauna. As you dive into building your sauna, gathering essential building supplies is key to achieving the perfect oasis.
These materials include foundation and structural elements, quality lumber, while premium, offers excellent aroma and durability, and effective insulation and vapor barriers.
Framing and Structural Materials
Choosing high-quality lumber is essential for sauna framing, which is crucial for longevity and structural integrity. For increased strength and stability, especially for larger saunas that may need more support beams, consider engineered wood products.
Take a look at what sizes and dimensions will work best for your overall design before buying to ensure everything fits together.
Insulation Choices for Heat Retention
Thermal efficiency is essential when determining the insulation material you will use. Check the R-value to measure how well it holds heat, and make sure that it’s moisture-resistant to fight off mold.
To maximize energy efficiency, professional insulation installation will ensure that your sauna remains warm and welcoming.
Vapor Barrier Selection
An appropriate vapor barrier will keep moisture out of your sauna. Use a good building material and install it properly to keep the insulation safe.
As with any structure, regular inspections for wear or damage are important to ensure it stands the test of time.
Roofing Materials and Installation
Choose roof materials that will hold up against the weather conditions where you live. Sealing and insulation installation guidelines should be followed, and the slope of the roof should be taken into account to ensure adequate drainage.
Door and Window Specifications
Energy-efficient insulated doors and windows are important features. Sealing tightly to avoid drafts is important, and the materials you choose should match the look and feel of your new sauna.
Careful consideration of window placement can provide ample natural lighting and ventilation.
Ventilation System Components
Having a planned ventilation system in place will encourage movement and circulation of fresh air. Add intake and exhaust vents, or adjustable intake and exhaust vents, so users can customize sauna temperature.
Make maintenance a priority. Regular upkeep is key to ensuring the system operates at peak efficiency.
Heating Unit: Wood, Electric, or Gas
Consider available heating units to choose one compatible with your daily routine. Note that each of the different options has different installation requirements and costs.
Make sure whatever you choose meets safety guidelines.
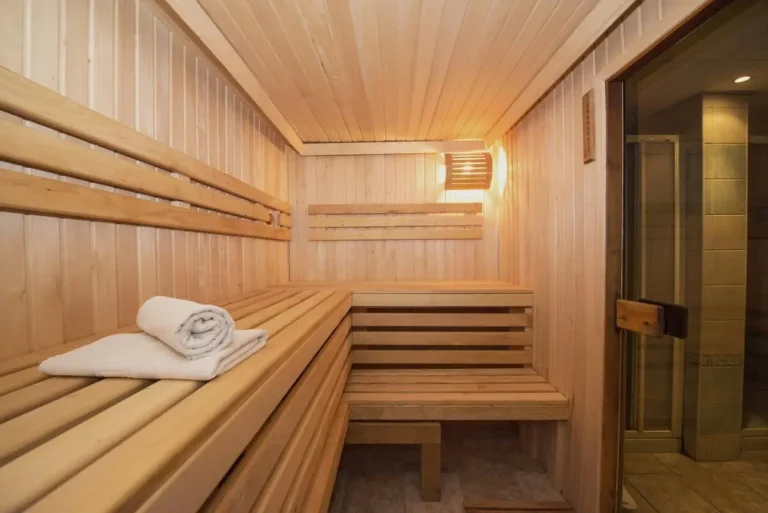
Benches and Interior Wood
Select sound, durable wood for benches that withstand extreme temperatures. Thoughtful layout design can go a long way in maximizing comfort, and wood treatments help protect wood against heat and moisture.
Lighting and Electrical Supplies
In fact, lighting fixtures for sauna use must be rated for high-temperature environments. Work with a qualified electrician to plan electrical wiring according to local safety codes.
Use moisture-resistant components when necessary to ensure safety and functionality.
Construct the Sauna Structure
Crafting an outdoor sauna from scratch isn’t as easy as throwing up some walls and lighting a fire inside. A specific plan will serve as your blueprint, directing what you build, where, and when, keeping the entire construction process organized. This method reduces mistakes and helps guarantee each element fits perfectly into the bigger picture.
Build the Floor Frame
Begin by building a solid floating floor frame out of treated lumber members. This decision is important because the treated wood has an increased rot resistance due to the way the moisture is repelled.
When discovering how to build an outdoor sauna, remember: 16-inch joist spacing creates optimal support, while layered moisture protection (vapor barrier + plastic sheeting) safeguards against ground humidity.
Last, carefully level the floor frame to ensure a sturdy and comfortable base for the sauna.
Erect the Walls Securely
Then, build the exterior walls to standard framing practices. Make sure each wall is square and plumb. This is very important in terms of aesthetics and structural integrity.
Provide and maintain temporary diagonal bracing during construction to provide stability. Fill the wall cavities with an effective insulation material, like fiberglass batts or foam boards, to maximize energy efficiency.
Continue to periodically check for square as you assemble each wall panel to ensure an even structure.
Install the Roof Properly
Follow standard roofing protocol, taking advantage of the roof to guarantee a tight and safe fit along with water protection. Choose materials that will stand up to the elements; even some asphalt shingles or metal roofing would work.
Insulating the roof prevents extreme heat from creating an inhospitable interior sauna environment. Prior to your final completion, go through and check the roof structure for any weak points to guarantee a lasting performance.
Frame and Install Door and Windows
Build door and window frames that allow a tight fit. Make sure openings through the roof and walls are well sealed to stop drafts from escaping and ruining the sauna’s warmth.
Pick door hardware that is sturdy and weather-resistant so it can stand up to outdoor use. After the installation, continue to monitor and operate doors and windows to help confirm that they provide the expected performance and functionality.
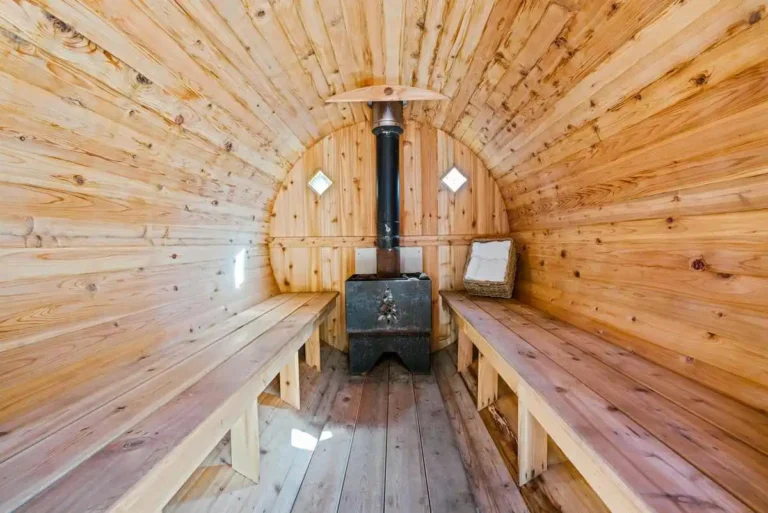
Select Your Sauna Heat Source
Selecting the appropriate heat source for your outdoor sauna will ensure you have the most comfortable, enjoyable experience possible. Each one has its distinct set of pros, and knowing those pros will best position you to make the right choice for your needs.
Research the Different Types of Heaters Available for Saunas
Begin by looking into the different heater types, including wood-burning stoves, electric heaters, and gas heaters. Each type comes with its own set of benefits.
Wood-burning stoves provide an authentic sauna experience, infusing the air with a rich, earthy aroma. Electric heaters offer fast heat and convenience. Gas heaters tend to be the most efficient heat sources, and they offer even, consistent warmth.
Evaluate the Heating Capacity Needed Based on Sauna Size
Then determine how much heating power your sauna will require according to its size. For example, if you have a small sauna, you’ll require a heater with a capacity of about 4.5 kW.
In comparison, bigger saunas can require 9 kW or higher. Choosing the correct heater based on your sauna’s square footage will provide a more efficient and comfortable experience.
Consider the Ease of Use and Maintenance for Each Heating Option
Consider how convenient each one is in terms of use and maintenance. Electric heaters generally have lower maintenance requirements compared to wood-burning stoves, which need constant cleaning and management of firewood.
Gas heaters can be handy too, but should be checked frequently for safety.
Ensure the Chosen Heat Source Aligns with Your Sauna Goals
Thirdly, consider what you want to achieve with your sauna. If you prefer a rough-hewn, old-world vibe, a wood-burning stove could be perfect.
If you value high levels of convenience over everything else, you might be better off with an electric or gas heater.
Wood-Burning Stove Considerations
When choosing a wood-burning stove, be sure it suits your sauna’s aesthetic and size. Always allow for adequate clearance and ventilation to prevent fire hazards.
Account for firewood availability and storage, alongside their need for regular cleaning to maintain performance.
Electric Heater Installation Tips
It’s important to always follow manufacturer’s guidelines for safe installation. Double-check that connections are tight and secure and meet the current electrical code.
Whether it’s a wood stove or electric heater, the heater’s placement is important for even heat distribution, so make design decisions early.
Gas Heater Options and Safety
Compare different gas heater models in terms of safety and efficiency. Make sure you have adequate ventilation to avoid gas accumulation, and adhere closely to installation instructions.
Initiating the process of regular gas leak checks will improve safety, reduce fear, and increase peace of mind across communities.
Insulate and Ventilate Effectively
Poor insulation and ventilation sabotage sauna performance. That’s why understanding how to build an outdoor sauna properly means balancing heat retention (through insulation) with humidity control (via ventilation) – the hallmark of quality sauna construction.
Proper Insulation Techniques
Install insulation to avoid gaps and voids, which will improve the effectiveness of insulation. Large gaps can greatly compromise the sauna’s functionality and allow for unwanted heat loss. For your next project, choose high-quality fiberglass or mineral wool insulation for better thermal resistance, comfort, and energy savings.
A vapor barrier like this one is crucial to protect the insulation from moisture damage that can erode its effectiveness over time. Make sure the insulation is tightly fitted to the framing of your sauna.
Consistent inspections allow you to see signs of wear early, such as sagging or moisture accumulation. In doing so, you ensure your sauna’s longevity and appearance.
Essential Ventilation Strategies
When designing your sauna, consider incorporating passive and active ventilation systems. Passive vents help make way for this incoming fresh air by letting hot air escape, establishing an easy, natural airflow. Strategically place these vents to encourage airflow through the system and prevent loss of heat.
Utilize active systems for improved circulation and filtration, such as running exhaust fans to improve outside air circulation, particularly during high occupancy use. Change the vent covers frequently to prevent clogs from dust, hair, or other debris, which can block air flow and reduce performance.
Controlling humidity is important not just for user experience, but because it allows you to change your sauna ventilation depending on sauna use and outside temperatures. If humidity levels are too high, then boost ventilation to help keep people comfortable and protected.
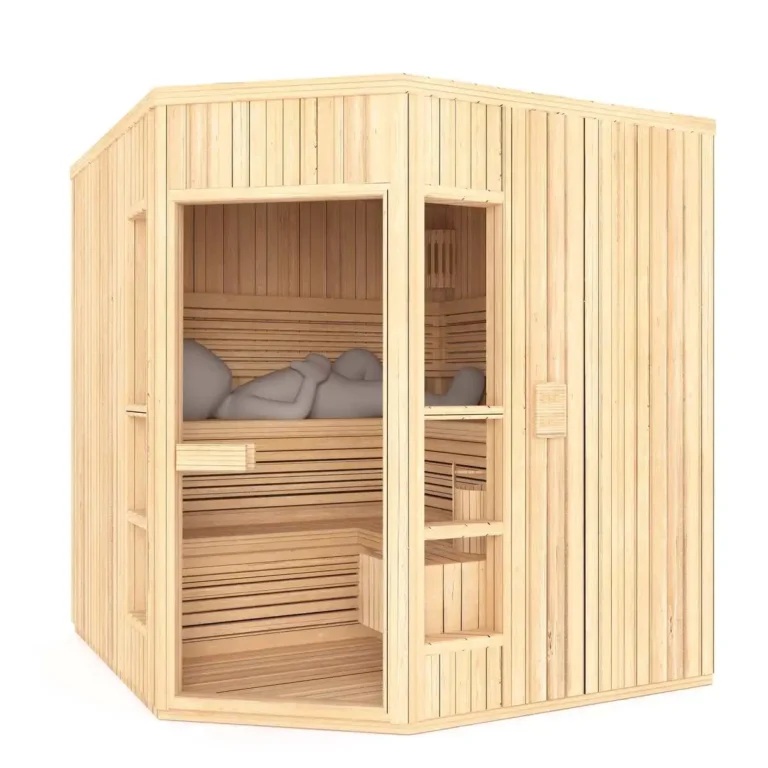
Customize the Sauna Interior
Designing a custom sauna interior makes all the difference in your sauna enjoyment. With the right design elements, you can turn the space into a relaxing personal retreat customized to your tastes.
Create a Relaxing Atmosphere
Start by selecting special design elements that match your style. Whether you choose to incorporate rustic wooden accents or go for a sleek, modern look, your sauna design should be an extension of your personality.
Bench Design and Placement
The design of the benches inside the sauna is an important consideration for comfort and space utilization purposes. Try constructing benches that offer plenty of seating without wasting space. Variations in heat exposure provided by tiered seating can accommodate diverse preferences.
Choose woods that are splinter-free and smooth to the touch so people will enjoy lounging on your sauna benches. This makes for a more comfortable sauna experience and makes the sauna even more luxurious.
Make sure the benches are anchored well enough that they can’t slide around while in use, so they’re as safe and steady as possible.
Lighting for Ambiance and Function
Lighting is incredibly important when it comes to crafting a calming environment. Pick out fixtures that match the sauna’s warm wood grain and bright color scheme, creating a calming space.
It’s an affordable upgrade. Installing dimmable lights throughout your home lets you set the perfect brightness for every occasion.
Moisture-resistant fixtures are crucial for safety and durability as they withstand the sauna’s humid environment, a key factor when learning how to build an outdoor sauna properly. Position lights strategically to minimize glare and shadows, creating the perfect calming ambiance for your outdoor relaxation space.
Add a Cold Water Source
Adding a cold water source is key if you want a truly invigorating post-sauna experience. Perhaps you’ve thought about putting an outdoor shower or cold plunge pool next to the sauna.
Make sure the cold water source is very accessible, so it’s convenient to cool down after your sauna session. Daily upkeep goes a long way toward ensuring the water source remains clean and welcoming.
That way, you can always count on a refreshing plunge just when you need it!
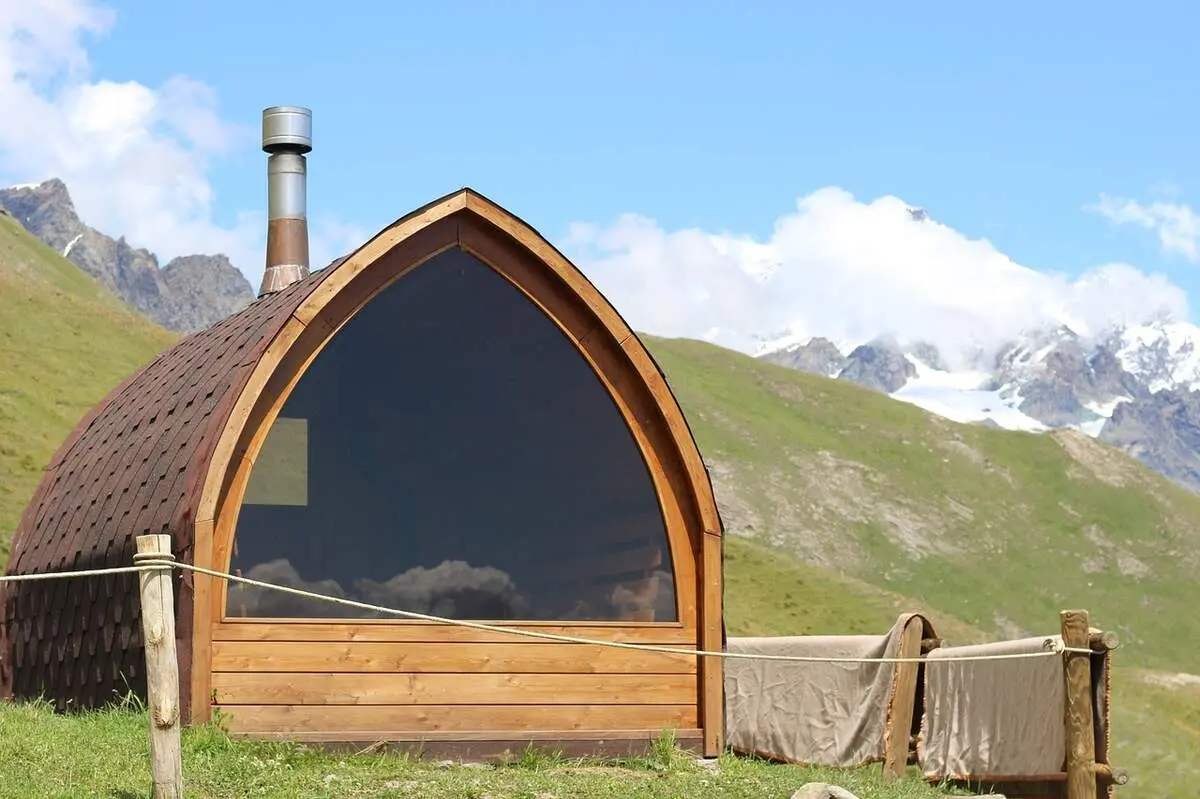
Exterior Finishing Touches
The exterior finishing touches to your outdoor sauna will add years to the life of the sauna … and you’ll enjoy all the more for it too. These aspects will keep your investment protected and provide a way for your sauna to make sure it blends in with its surroundings.
Thinking ahead to durable materials, aesthetics, and maintenance will go a long way toward making your sauna work beautifully and work beautifully.
Choose Exterior Cladding
Choosing long-lasting, low-maintenance cladding materials that can stand up to the elements is essential in avoiding the cycle, especially when considering how to build an outdoor sauna that withstands weather extremes. For best results, use decay-resistant wood species like cedar or redwood, which offer natural durability against moisture and rot.
It’s a great opportunity to learn about new composite materials that deliver the permanence you need without the maintenance requirements inherent in wood products. Applying protective finishes to exterior wood surfaces increases the resistance to weathering, keeping your sauna in like-new condition for many years.
Choose finishes that accentuate the grain and beauty of the wood. Choose a dark, warm palette that beautifully contrasts with the prosocial nature of the outdoors.
To ensure consistent protection against moisture intrusion and UV damage, regularly reapply these finishes—generally every two years. Protect your health. Avoid products that are harmful in a sauna environment and emit dangerous fumes when exposed to high temperatures.
Apply Protective Finishes
It helps to know general safety guidelines for sauna use in order to have a safe, enjoyable experience. Teach users about what to expect outside and inside a sauna, including time limits and hydration needs.
Make sure smoke detectors and fire extinguishers are in top shape by testing them regularly. Confirm that all electrical components are up to code and free from any potential fire hazards.
In turn, you’ll design an environment with a high level of comfort that will promote rest and rejuvenation. Frequent checks and upkeep of the exterior finish are essential for a long-lasting product.
Get in the routine of checking periodically to look for worn-out or damaged parts. Fix all problems right away to avoid having them grow into larger issues later on.
With this proactive approach, your sauna will continue to look good and perform well for many years.
Ensure Sauna Safety
Creating a safe sauna environment can help ensure a positive sauna experience. Whether it’s at your yoga studio or gym, creating ground rules around sauna usage sets the tone and provides guidelines to protect all users.
To be safe, limit total session time – start with 15-20 minutes. If users begin to feel lightheaded or unwell, remind them to leave right away. Be diligent about checking temperature and humidity to maintain safe and super hot conditions.
Target a temperature range of 150°F to 195°F and keep humidity levels at 10%-20%. Maintaining this balance is key to avoiding overheating, which can cause life-threatening health problems.
Hydration is perhaps the most talked about sauna safety concern. Remind users to hydrate with water before they enter—and train them to rehydrate with electrolytes after sauna use.
This practice actually promotes better health and maximizes the benefits of sauna usage, leaving users feeling great during and after their sessions—an important consideration when learning how to build an outdoor sauna. Always provide clear instructions, whether for sauna operation, emergency evacuation routes, or locating the nearest first-aid kit.
General Safety Guidelines
Keeping adequate clearance from combustible materials and open flame appliances is the first line of defense against stove-related fire hazards. Keep combustible materials no closer than 36 inches from the stove.
Check the stove at least annually for signs of wear or dysfunction like rust or rattling. Proper education of users on safe operating procedures will further improve safety, making sure each person using the stove knows how to operate it safely and correctly.
If needed, use heat shields to keep nearby combustible materials safe from intense heat.
Stove Safety Measures
Even expensive saunas can end up being dangerous if you don’t know what to look for. Make rather sure to verify plans and measurements before making any cuts.
Once the material is cut, mistakes can cause major rework. Ventilation should be part of your sauna design from the outset, ideally providing a source of fresh air that contributes to a more comfortable sauna experience.
Monitor progress closely to identify problems early on, like an uneven surface or improper insulation.
Avoid Common Construction Mistakes
Constructing an outdoor sauna is a terrific way to enjoy these perks, but careful construction is necessary to ensure it lasts and performs well for years to come. Below, I’ll run through some of those missteps, what caused them, and how to avoid making the same mistakes.
Foundation Issues and Solutions
Ignoring foundation issues can create big problems in the future. Check for any settling or cracking, which can be an indication of instability. If you’re experiencing any of these indicators, it’s time to either reinforce or re-level your foundation.
When learning how to build an outdoor sauna, remember that frequent inspections and proactive maintenance are key to longevity. Proper drainage is equally crucial – it prevents moisture damage that could compromise your entire DIY outdoor sauna structure. These steps ensure your backyard sauna stays in perfect condition for years of relaxation.
Insulation and Ventilation Errors
Bad insulation can wreak havoc on sauna performance and experience. Common mistakes are insufficient insulation or incorrect installation, causing heat to bleed out. Proper sauna insulation will ensure that your sauna heating unit can circulate and maintain warmth efficiently.
Ventilation systems need to be designed and installed properly to help control humidity. If not, you’re inviting dampness and mold into your building. Monitor for gaps in insulation. Over time, humidity, temperature, and usage patterns will affect the sauna experience.
Wood Selection Pitfalls
Choosing the proper wood for your sauna is very important in sauna construction. Stay away from species that are prone to warping or exposure to moisture. Choose species such as cedar or hemlock, both of which are resistant to warping and splitting.
When learning how to build an outdoor sauna, always use untreated wood free from harmful chemicals to prevent toxin release when heated. Conduct routine inspections to catch early signs of damage or decay—this proactive maintenance ensures your DIY outdoor sauna stays safe and comfortable for years.
Creating a routine and consistent maintenance program is key. Clean surfaces to prevent grime buildup, and check heating units and electrical components for safety. Addressing wear or damage promptly keeps your sauna in top condition.
How to Maintain Your Outdoor Sauna
Taking time to properly maintain your outdoor sauna can help it last longer and perform better. Regular maintenance makes your sauna experience more enjoyable while safeguarding your investment. With a little maintenance know-how, you’ll be able to create an inviting sauna experience every time.
Regular Cleaning Practices
Create a maintenance schedule that includes regular deep cleaning and daily upkeep like wiping down surfaces after each use. This easy maintenance task stops moisture and debris from collecting. Avoid using harsh or toxic cleaners as they can damage the wood and other finishes.
When planning how to build an outdoor sauna, avoid harsh chemicals that cause pitting and surface damage—opt for natural cleaning solutions instead. Proper maintenance includes checking ventilation systems and cleaning air ducts to ensure airflow, which prevents mold growth in your DIY outdoor sauna.
Regularly deep cleaning your sauna every few months helps maintain a sanitary environment and leaves your sauna with a beautiful shine.
Wood Treatment and Preservation
When learning how to build an outdoor sauna, choosing the right wood preservatives is key for longevity. These finishes protect against moisture, UV rays, and weathering—critical for outdoor saunas. Reapply treatments regularly based on exposure to keep your DIY sauna durable for years.
Check the surrounding wood for any signs of deterioration, such as darkening or cracking. Be sure to tackle problems right away so they don’t create bigger damage. Applying natural oils or finishes increases the natural beauty of the wood while providing additional protection against wear and tear.
Taking these steps ahead of time will ensure you’ll get the most enjoyment out of your sauna for years to come.
There are plenty of reasons why making your own outdoor sauna is a great idea. Their satisfaction and enjoyment of the DIY enterprise is reward enough. I hope people will come to sauna building as a meaningful pursuit that supports well-being and relaxation.
Telling the wider sauna community about your experience and sharing your ideas helps inspire other sauna enthusiasts and builds a sense of shared purpose.
Conclusion
Building your own backyard oasis is an incredible step toward a life of relaxation and wellness. In the process you create an incredible personal retreat, located right in your own backyard. By paying attention to each step, you will end up with a safe, solid, and fun sauna. Make sure you plan out your project carefully and collect the correct materials.
Pick a good base.Pick your heat source.Pick one that works for you.Ensure adequate insulation and ventilation to retain the heat and ensure a continuous supply of fresh air. Personalize the interior however you’d like, then wrap up the exterior to suit your taste. Safety is extremely important, so monitor your progress as you work. Follow proper maintenance so you can enjoy your sauna for many years to come. Take that first step and join us on the road to your backyard sauna!